
Graphs and agents New
A graph holds the plan for a larger job: what should exist, in which order, and what is done. A roadmap, a release plan or a research map are graphs. Sessions do the work, and each session is linked to the node it works on.
You are the one who decides. Agents may change the graph while they work, and you review what they did.
Create a graph
In the sidebar, find Graphs and click + New.
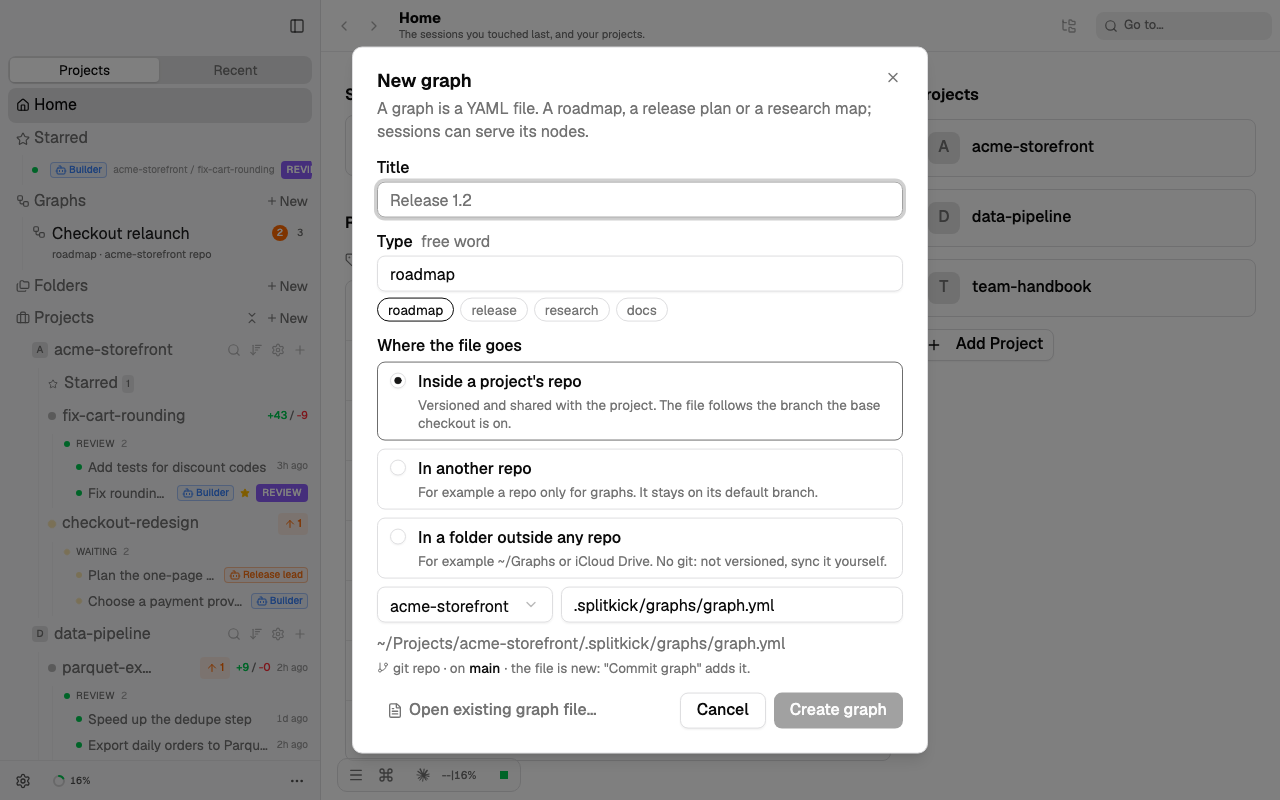
- Give a title and a type. The type is a free word such as
roadmaporrelease. - Choose where the file goes:
- Inside a project's repo: versioned with the project.
- In another repo, for example a repo only for graphs.
- In a folder outside any repo, for example
~/Graphs. No git.
- Click Create graph. To add a graph file that already exists, use Open existing graph file….
A graph is a plain YAML file. You can edit it in any editor; Splitkick shows the change within a few seconds.
A graph inside a project's repo is on the branch that the project's main folder has checked out. When that is not the default branch, Splitkick shows a warning: in the New graph dialog, on the branch chip of the graph, and next to the graph in the sidebar.
Commit the graph
Click Commit graph at the top of an open graph. Splitkick commits only the graph file, no other change in the repo. When the file has no changes, you get the error "Nothing to commit: … has no changes".
Graphs in the sidebar New
The Graphs section at the top of the sidebar lists all graphs. Each project also has its own Graphs row, next to Pinned & Starred. Click the row to open or close it. Splitkick remembers this for each project.
The row lists:
- the graphs stored in the project,
- then the graphs from elsewhere that one of the project's sessions works on. These rows show "from" and the other project, or "from instance" for a graph that belongs to no project.
Each row shows the open requests and the changes you did not see yet. Click a row to open the graph. The row of the open graph stays highlighted. A project without such graphs has no Graphs row.
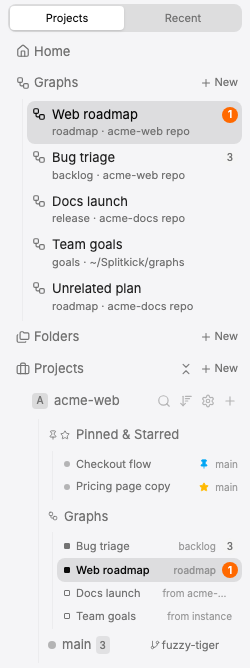
Under the project, the Graphs row lists the graphs stored in the project, then the graphs its sessions work on from elsewhere ("from …"), with the counts of open requests and unseen changes.
The project view lists the same graphs under Pinned & Starred, also on the phone. Tap a graph to open it.
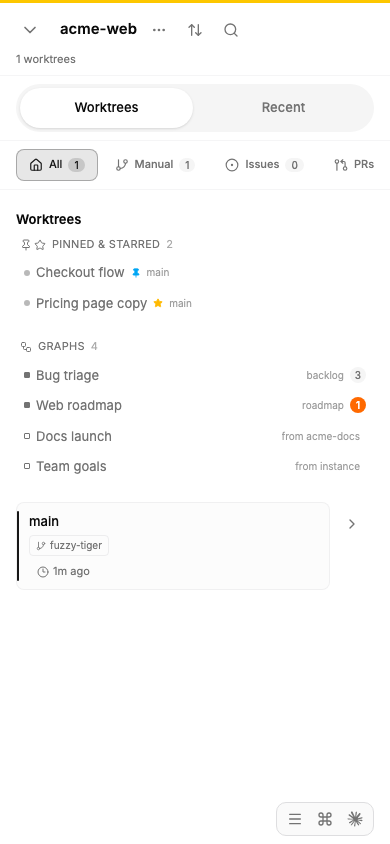
The project view on a phone lists the graphs of the project under Pinned & Starred.
The outline
The Outline tab shows the nodes, grouped under their parent node. Each node has one of four states:
| State | Means |
|---|---|
| Idea | Somebody suggested it. Nobody agreed to do it yet. |
| Planned | It will be done. |
| Done | It is finished. |
| Dropped | It will not be done. |
Next to a node, Splitkick shows what it computes for you: active (a session on this node is running), blocked (it waits for another node or for a decision) and the progress of a parent node. An orange dot marks a node that an agent changed since you last looked.
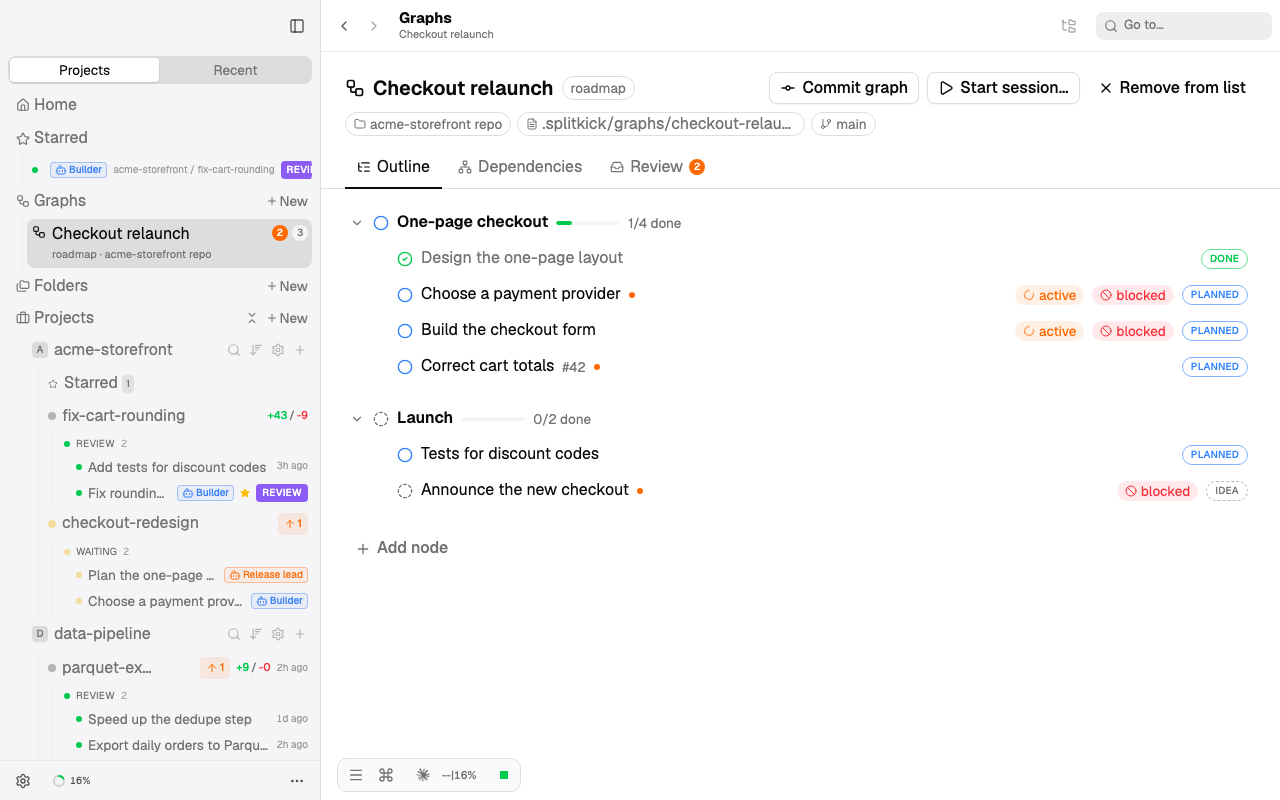
A node: the simple view
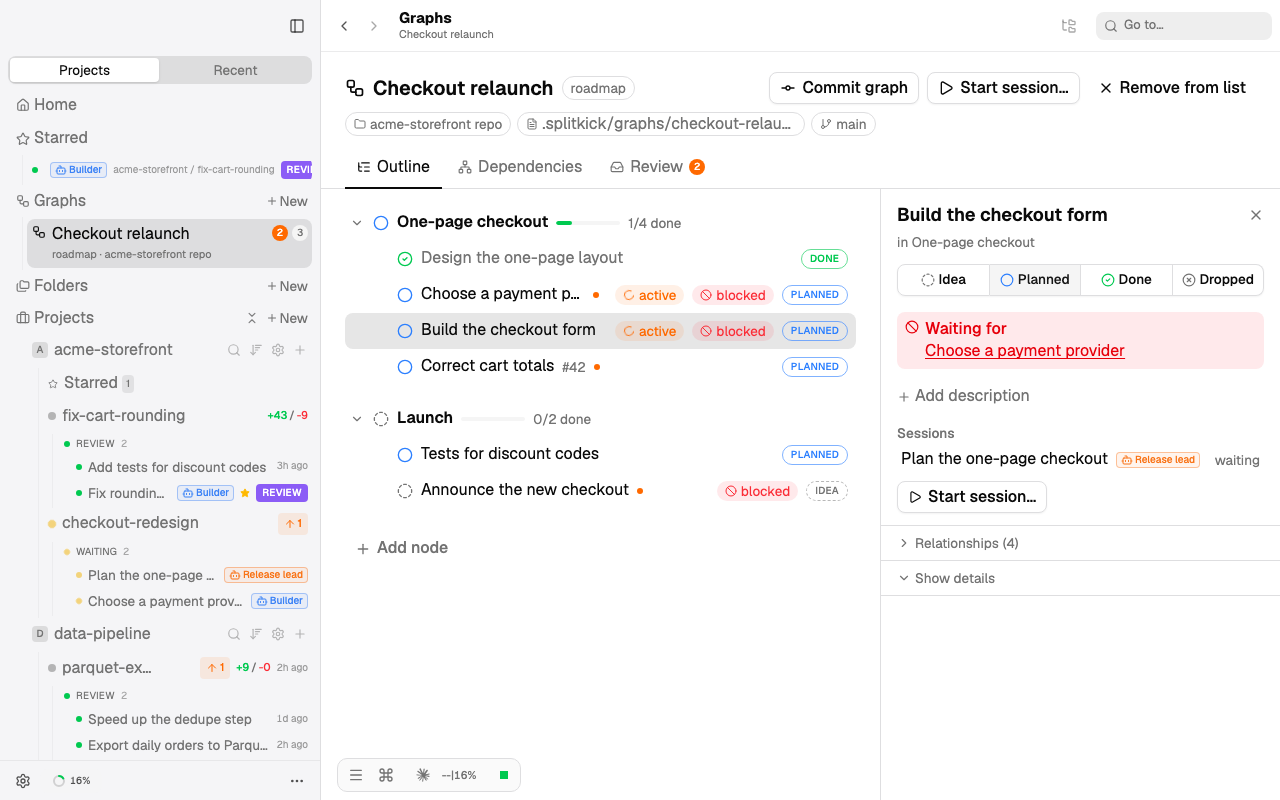
Click a node to open it on the right. You first see only what you need to work with it:
- its title, and the parent node it belongs to,
- its state, as four buttons,
- what it waits for: another node (click it to go there) or an open decision,
- a link to requests that wait for you on this node,
- its description,
- the sessions that work on it, and Start session… to start one more.
Two foldouts follow: Relationships and Show details.
A node: relationships
Under the simple view, Relationships opens a foldout with the links of the node: the relations stored on it (with Add relation) and the relations that other nodes have to it. The number shows how many there are.
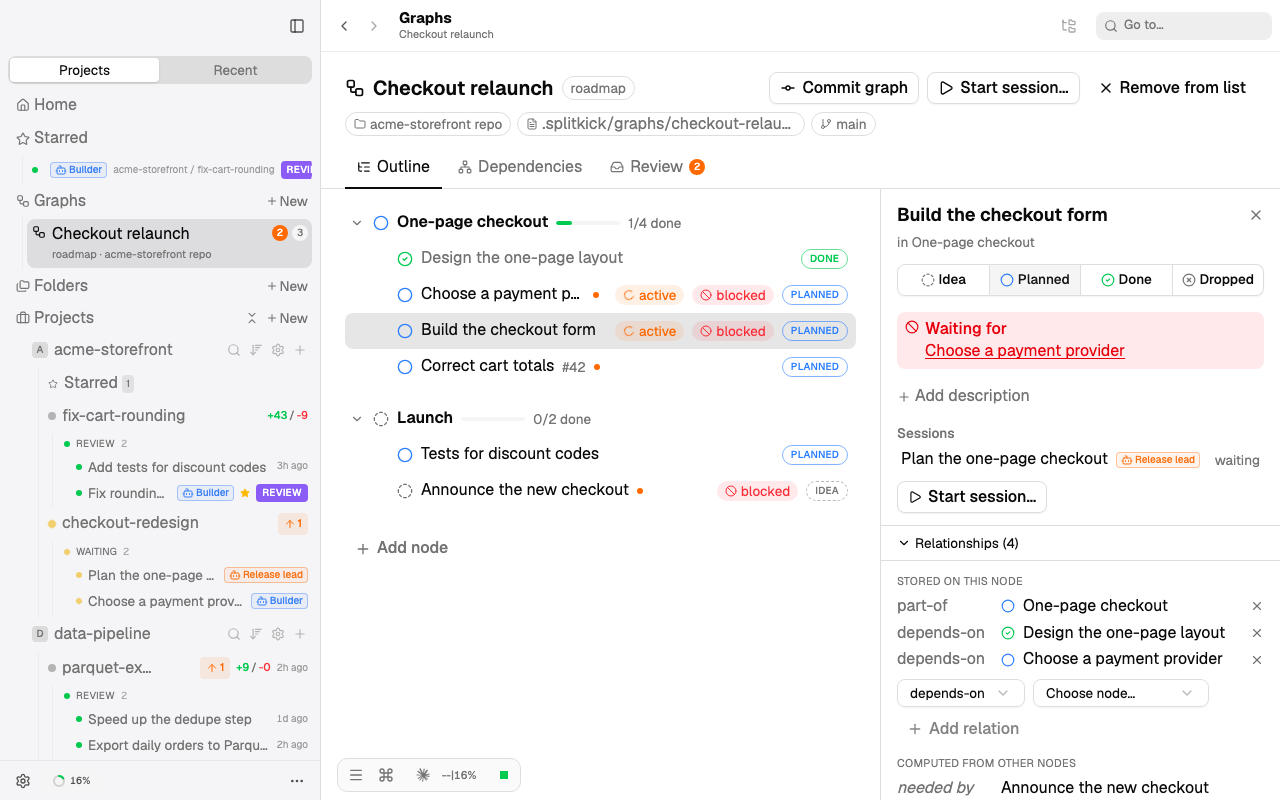
Relations use the words of the file:
| Relation | Means |
|---|---|
part-of | This node belongs to a parent node. |
depends-on | This node can start when the other node is done. |
blocked-by | This node waits for another node or for a decision (free text). |
relates-to | A loose link, also to a node in another graph. |
A node: the details
Click Show details for everything else: the node id and its state in the file words, properties, attachments, the history of changes with who, when and why, and Delete node. Hide details closes them again.
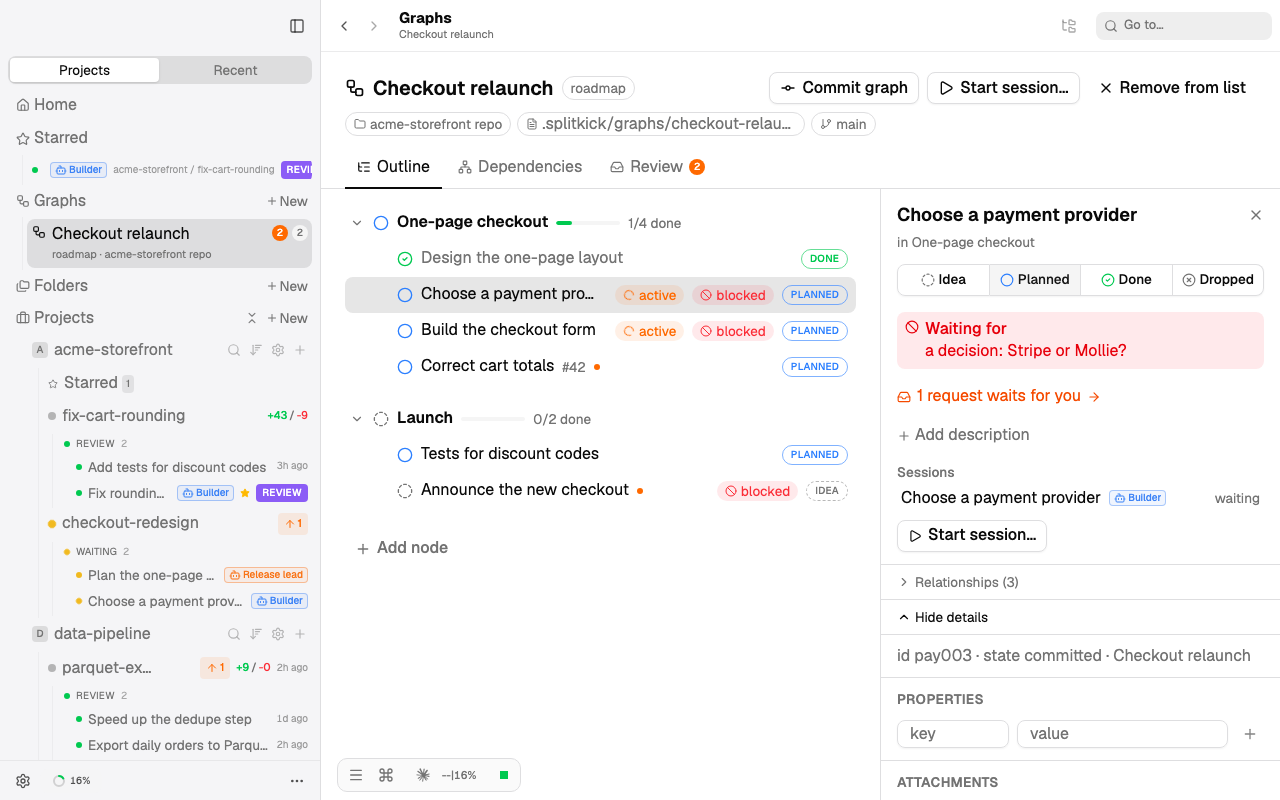
Splitkick remembers for every node and every session whether Relationships and the details are open.
The file also keeps its own words for the states: proposed (Idea), committed (Planned), done, dropped. Agents use the file words.
Dependencies
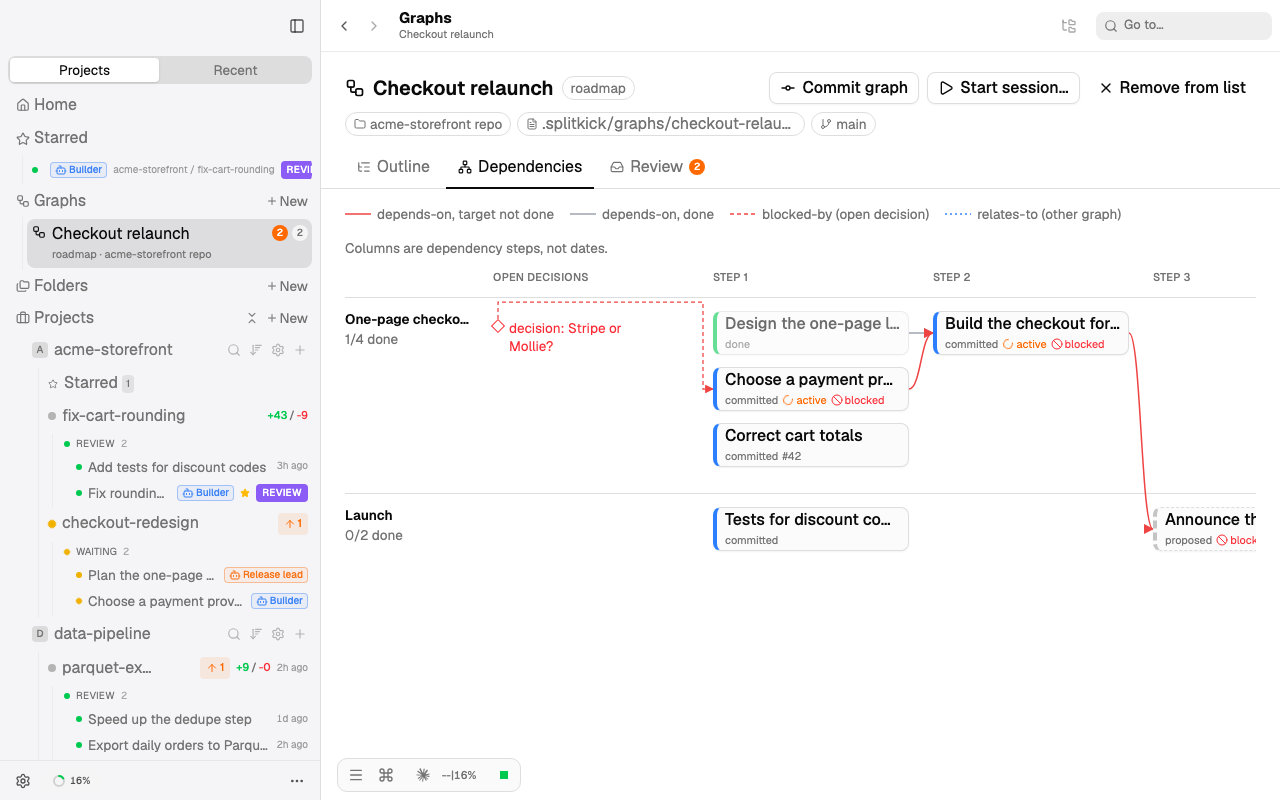
The Dependencies tab shows the order of the work from left to right: the columns are steps, not dates. Open decisions are at the left, because they block the nodes behind them.
Review what agents did
The Review tab is where agents ask you, and where you see what they changed.
- Requests for you: accept a node as done, send it back with a note, or answer a decision that blocks a node. Your answer goes to the session that asked.
- Changes since you last looked, with who, when and why. Mark them seen, or revert one.
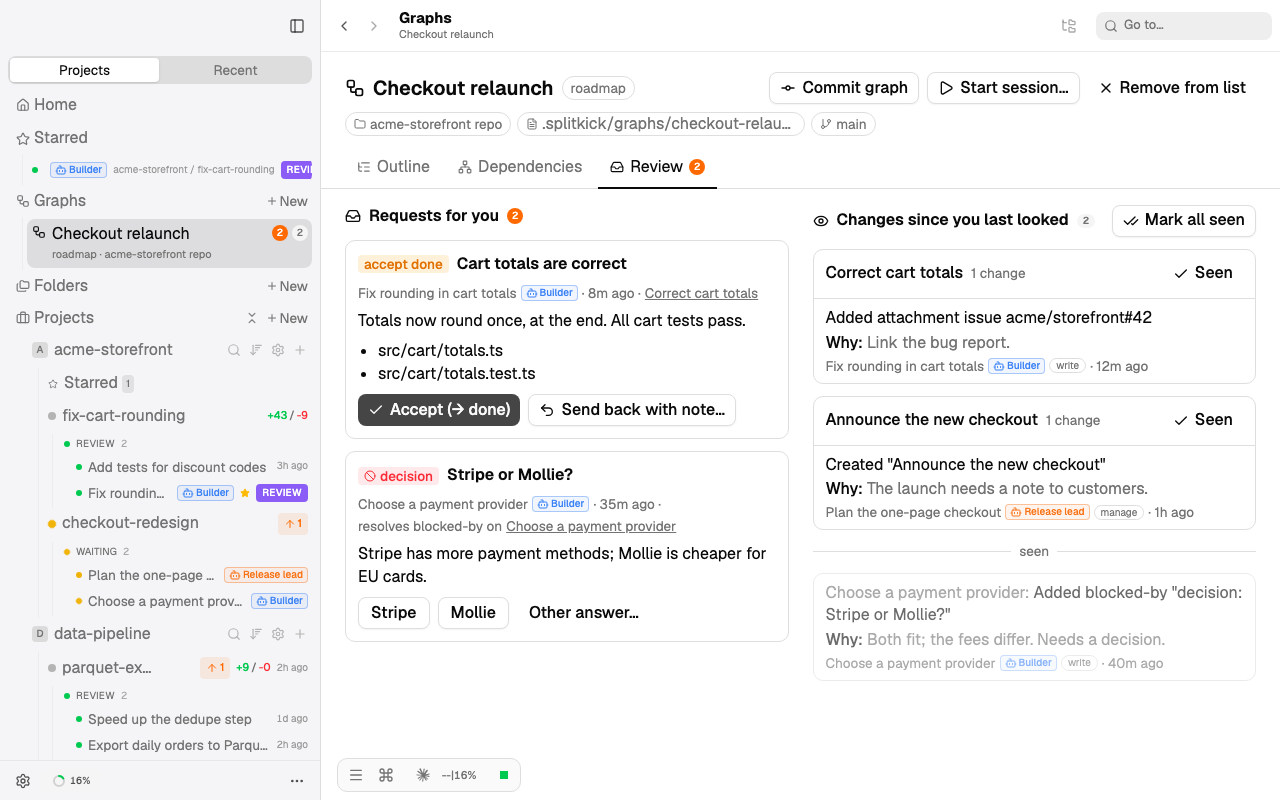
Link a session to a graph
Every session can be linked to a node, or to a whole graph. Right-click a session (long press on the phone) and choose Link to Graph…, or use Link to Graph… in ⌘K. The menu item is on every session: in the sidebar, on the canvas tabs and on the Pinned and Starred rows.
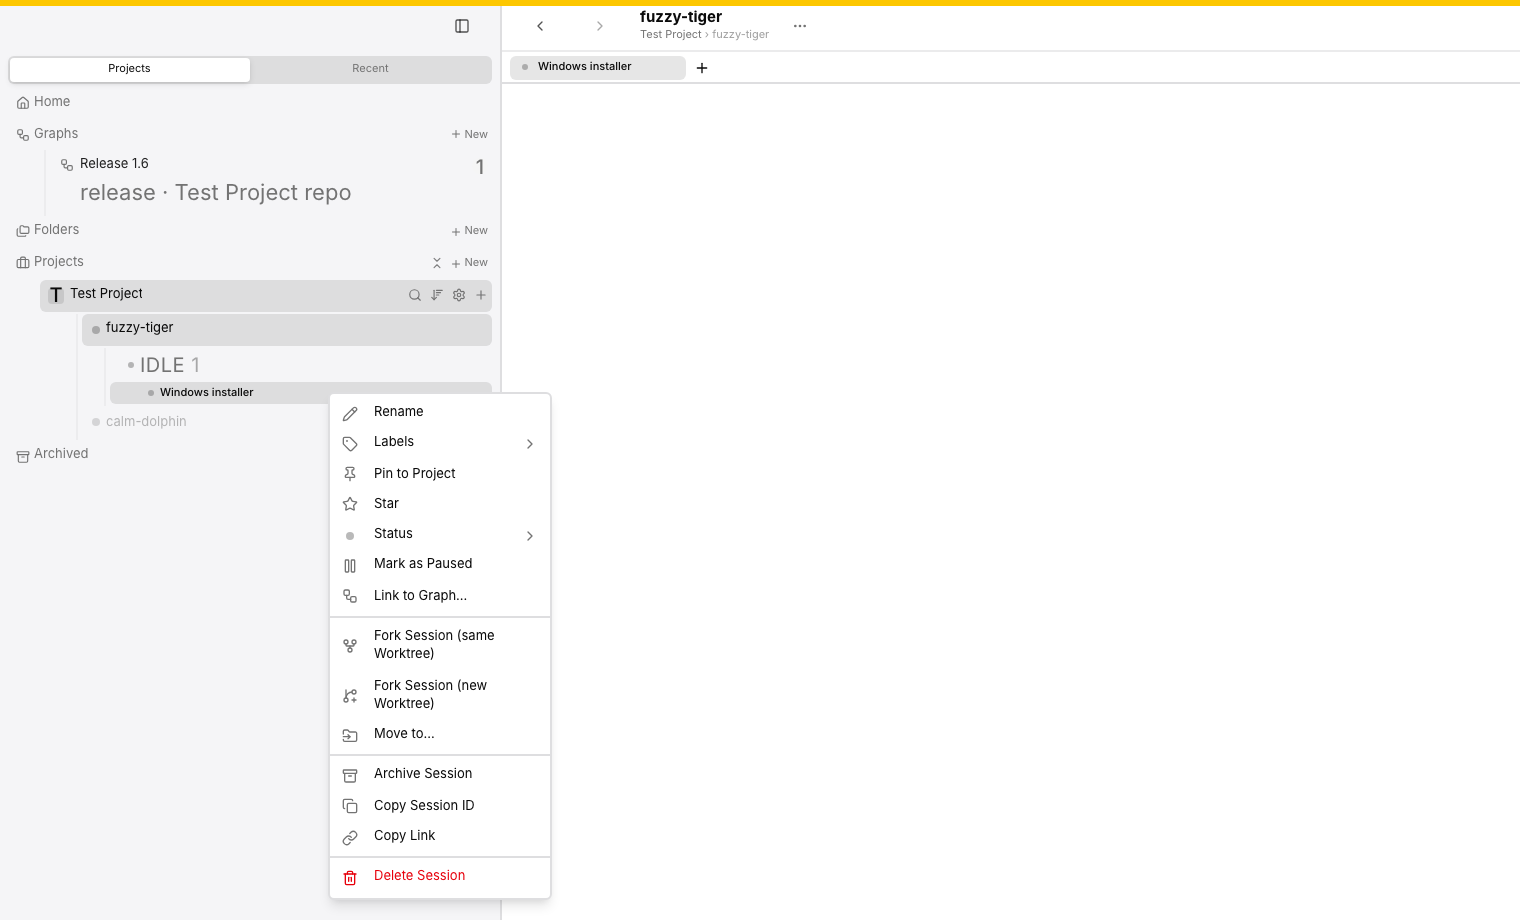
Right-click a session and choose Link to Graph….
The dialog shows the current links. Pick a graph, then a node or (whole graph), and click Add. A session can have more than one link. To remove a link, click the × on it.
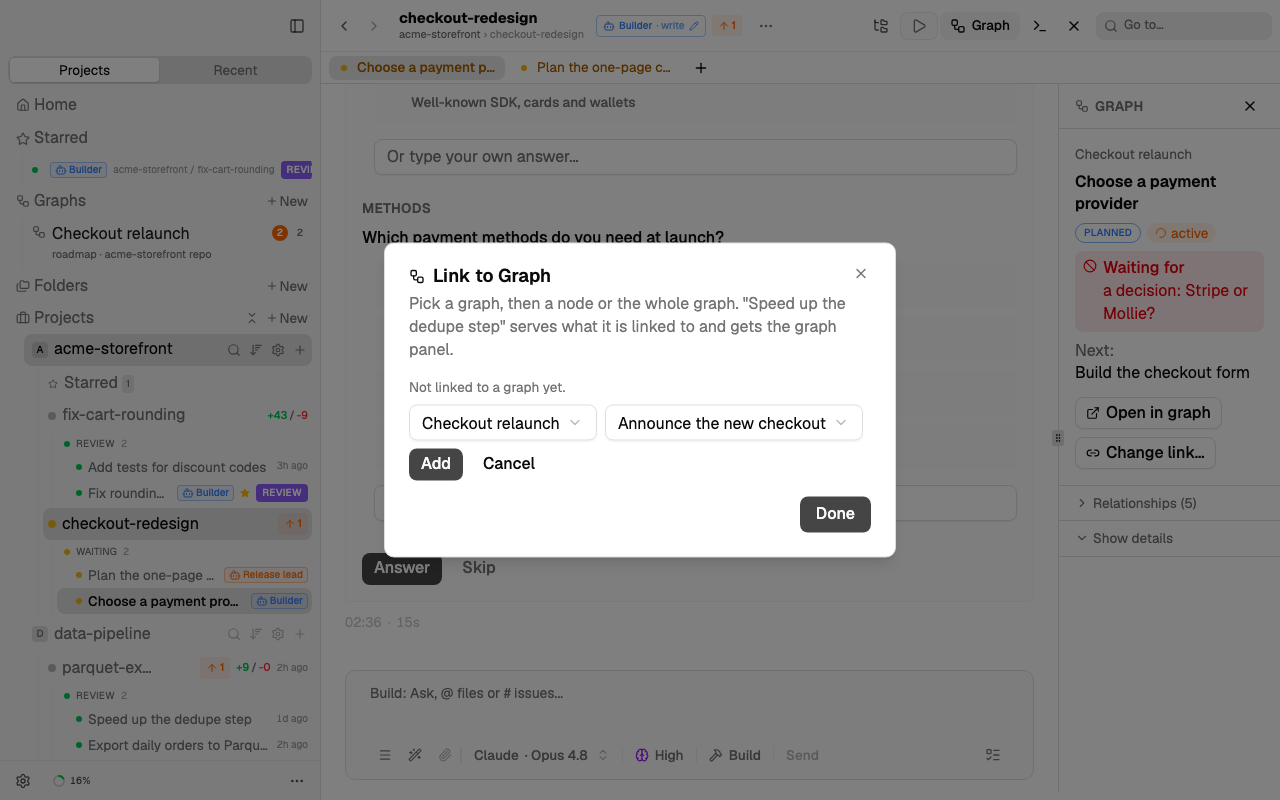
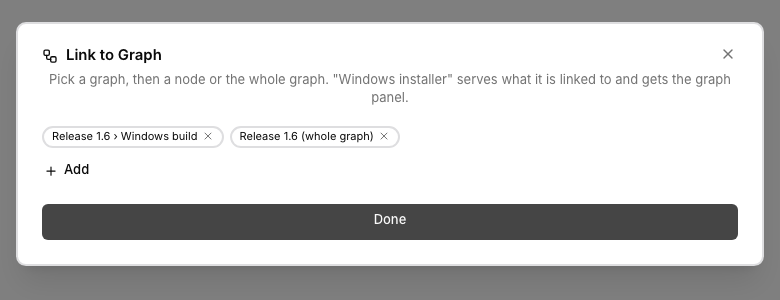
A linked session gets its node in its system prompt, and the agent can read and change the graph through the MCP server.
An agent with the manage permission can also link other sessions. It must give a reason. The change shows in the Review tab under Changes since you last looked, and you can undo it with Revert.

A manager session linked another session. The change and its reason show in Review, with Revert.
The Graph tab in a session New
Since 1.5.2, the graph card of a session is the Graph tab of the side panel left of the chat. The panel has the tabs Files, Network, Graph and, since 1.5.3, Artifacts. The tab always shows the session on screen.
To open the Graph tab:
- click Graph in the toolbar of a session (the button is hidden for a session without a link),
- run Toggle Graph Panel in ⌘K,
- or press ⇧⌘G. You can change the shortcut in Settings → Keybindings.
The tab first shows one card:
- A session on a node: the graph, the node, its state, what it waits for, and what comes next when it is done.
- A session on a whole graph: the progress, the requests that wait for you, and the new changes.
Open in graph opens the graph. Change link… opens the Link to Graph dialog.
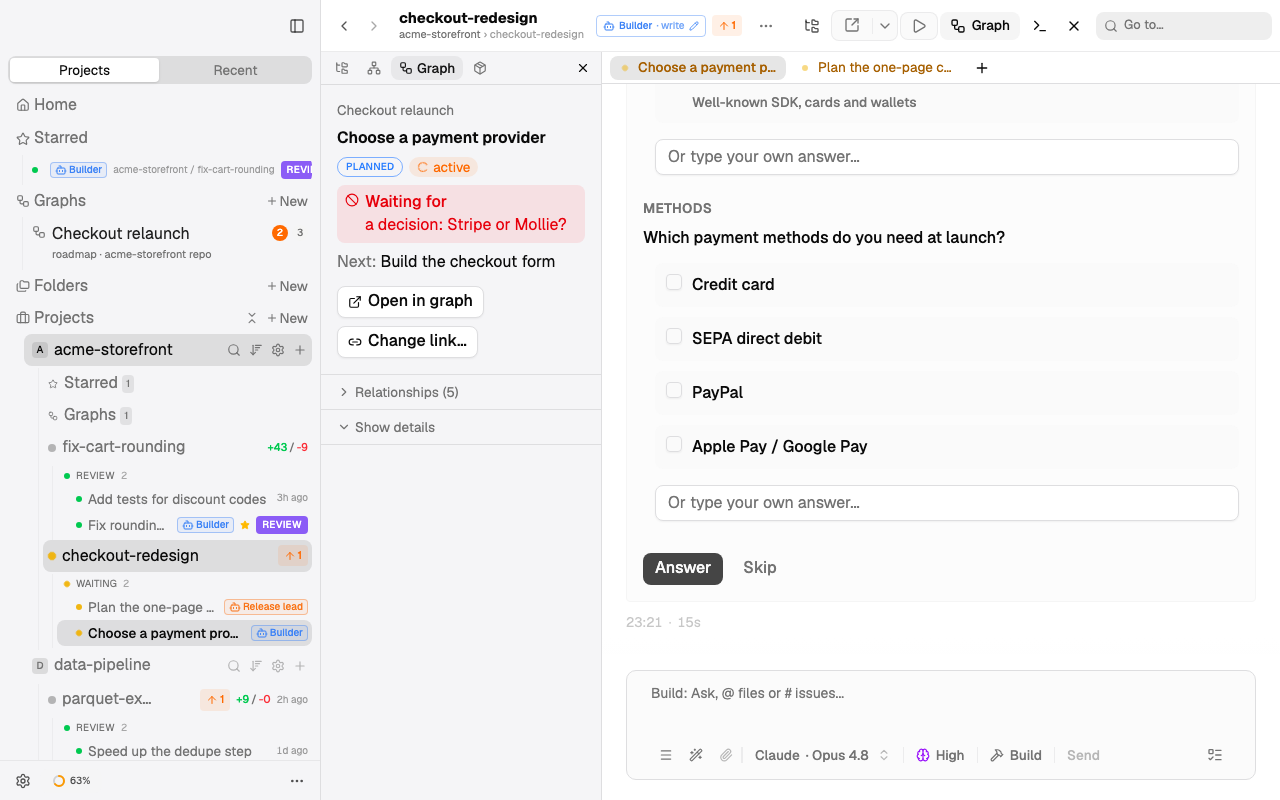
The Graph tab shows the session's node, its state, what it waits for and what comes next, Open in graph and Change link…, then Relationships and Show details. The four icons at the top of the panel are Files, Network, Graph and Artifacts.
Relationships (for a session on a node) shows what comes before and after the node, and the other nodes under the same parent, with this session's node marked.
Show details adds the rest: the node id, other sessions on the node, what the session may do in the graph, and its links.
A session without a link shows "This session is not linked to a graph." and a Link to Graph… button in the tab.
On the phone, the side panel opens as a drawer with the same tabs, so the graph card works there too.
Agents
An agent is a saved profile: a persona prompt, a graph permission and a default model. Edit them in Settings → Agents.
| Permission | The agent may |
|---|---|
| read | read graphs, and set which node its own session works on |
| write | also create and edit nodes, and send requests to you |
| manage | also mark nodes done, drop nodes, commit the graph, and change the links of other sessions |
Start a session from an agent with Start session…: in a graph, on a node, in Settings → Agents, or in ⌘K. The persona and the linked nodes go into the session's system prompt. When you edit a persona, every session of that agent gets the new text with its next message.
Agents must give a reason with every change. You see it in the history of the node and in Review.